Perception
Perception
Section titled “Perception”For the perception starter project, you will implement a ROS2 node that uses camera data to detect ArUco tags using OpenCV, a popular computer vision library. Navigation will read this data in order to drive towards and align the rover with it.
Examples of ArUco tags are pictured below. ArUco tags have an ID that corresponds to the pattern it contains.

Nodes, Topics, Publishers, and Subscribers
Section titled “Nodes, Topics, Publishers, and Subscribers”Before we start, let’s clarify some unique ROS features and vocabulary. What are nodes and topics? What does “publish” or “subscribe” mean? First, let’s talk about nodes. You may have written programming projects in the past that start in a main() function, and then run sequentially before exiting. In contrast, you can think of ROS2 projects as being a collection of independent processes constantly running at the same time. Each of the processes is called a “node”, and they usually do not exit unless the user stops it.
It usually isn’t very useful to have a bunch of nodes that are unable to communicate with each other. This is where publishers, subscribers, and topics come in. In this starter project, the Perception node will transmit its results to the Navigation node through this framework.
Inputs
Section titled “Inputs”- Image data:
Imagemessages published to the/zed/left/imagetopic
Outputs
Section titled “Outputs”- A custom message published to
/tagtopic containing data about the closest detected ArUco tag:- The tag’s ID
- The x-coordinate of the center of the tag in the image
- The y-coordinate of the center of the tag in the image
- A closeness metric representing how far away the tag is
Note: the ROS2 humble wiki, software leads, and fellow members are a great resource if you are struggling with anything. Don’t be afraid to ask questions; it’s how we learn!
Implementation
Section titled “Implementation”Creating a Custom Tag Message
Section titled “Creating a Custom Tag Message”ROS projects can be thought of as a collection of nodes that talk to each other via named topics. However, without any extra information, the data flowing between the nodes are just bytes.
Messages help define how this data is structured. ROS has many predefined message types, but you can also create your own custom message templates. We want to make a custom type that gives Navigation useful information about the ArUco tag. We have implemented this in msg/StarterProjectTag.msg for you.
int32 tag_idfloat32 x_tag_center_pixelfloat32 y_tag_center_pixelfloat32 closeness_metricYou will implement the functions in perception.cpp to identify the values of the above four variables, use them to construct a StarterProjectTag, and publish the message to the /tag topic for Navigation to read (“subscribe”) from.
From the terminal, make sure you are in the correct repository by running auton_starter and then build_starter to build the message file.
Code Overview
Section titled “Code Overview”To complete the Perception starter project, you will implement 7 functions of the Perception class:
- the Perception() constructor
- imageCallback()
- findTagsInImage()
- selectTag()
- publishTag()
- getClosenessMetricFromTagCorners()
- getCenterFromTagCorners()
Each of these functions have corresponding headers in perception.hpp that might be helpful. You shouldn’t have to create any other functions.
Setup with Perception()
Section titled “Setup with Perception()”Let’s take a look at the constructor Perception::Perception in perception.cpp. This function does a lot of important setup. Before we can figure out any information like where the center of the detected tag is, we first need to get the actual camera frame.
As detailed in the Inputs section, each frame from the camera is published to the topic /zed/left/image. So the first thing this function does is read the camera frames from the topic. We do this using a subscriber. Take a look at the following code block:
mImageSubscriber = create_subscription<sensor_msgs::msg::Image>("/zed/left/image", 1, [this](sensor_msgs::msg::Image::ConstSharedPtr const& frame) { imageCallback(frame);});This code defines a subscriber that subscribes to the topic /zed/left/image. The [this] lambda syntax may look confusing, but all it’s doing is calling the imageCallback function, passing the camera frame as an argument.
When a new camera frame gets published to /zed/left/image, the subscriber calls imageCallback with the new camera frame. Thus, imageCallback gets called roughly 60 times per second.
Now, uncomment the line starting with mTagPublisher. Once we’re done processing an image, we need to publish it to a topic so that other nodes, such as the Navigation node, can use our newly processed data. This is the job of a publisher, which publishes a message of a specific type to some topic. In our case, we define a publisher that publishes StarterProjectTags to the topic /tag:
// TODO: uncomment me!// mTagPublisher = create_publisher<msg::StarterProjectTag>("/tag", 1);Finally, we define the format of the tags we will be detecting by calling cv::aruco::getPredefinedDictionary(). The OpenCV library allows you to pick from various sets of valid markers. In this case we pick DICT_4x4_50, which means we guarantee that any ArUco tags we see will have 5x5 bit markers and an ID between 0-49. We’ll discuss this topic further when we actually perform the detections.
For now, by uncommenting the publisher, you’ve finished implementing the first function! Lucky for you, the rest of the functions will be a slightly more complex and require a bit of a creativity :)
Structuring the other functions
Section titled “Structuring the other functions”The Perception() constructor gets called only once, when the node is initially created. Before we get into implementation details for the remaining six functions, it’s a good idea to figure out what they should do and how they interact with each other.
Based on the names of the functions, the parameters/return variables for each function, and various comments, identify:
- The inputs and outputs of each function
- The order each function will be called in
- Which functions call each other
Talk with the people around you and the autonomy leads if you have any questions!
imageCallback()
Section titled “imageCallback()”Let’s begin implementing each of the functions. The details will be relatively sparse, since there is no “correct” solution or structure, so be creative!
Lets start with the imageCallback() function. There are a few lines already in imageCallback():
cv::Mat imageBGRA{static_cast<int>(imageMessage->height), static_cast<int>(imageMessage->width),              CV_8UC4, const_cast<uint8_t*>(imageMessage->data.data())};cv::Mat image;
cv::cvtColor(imageBGRA, image, cv::COLOR_BGRA2BGR);
All this does is convert from BGRA to BGR (blue-green-red), remove the alpha (transparency) channel, and store the resulting BGR image in the image variable. For the starter project, you do not need imageBGRA and should only use the image variable.
Hint: since imageCallback() is the function that gets called by the subscriber, you’ve hopefully identified that it must call at least one other function to do the processing.
findTagsInImage()
Section titled “findTagsInImage()”As the name suggests, this function’s goal is to extract all ArUco tags from the image parameter and place them into the tags output vector.
You will want to use the cv::aruco::detectMarkers() function for this. The hints in the comments and this example from OpenCV should give you an idea for what parameters you need to pass. Also, consider what other functions you might want to call from this function.
getCenterFromTagCorners()
Section titled “getCenterFromTagCorners()”This function’s goal is to find the xy-coordinates of the center between the four corners for each tag. There’s a few different ways to implement this function, so we won’t provide a strategy or design to do it. Discuss with your partners/people around you and leads! While there are a few edge cases, this center does not need to be perfectly accurate. Simple is often better than complicated.
Hint: once cv::aruco::detectMarkers() is called, mTagCorners and mTagIds should contain the xy-coordinates of the corners and IDs (0-49) of the tags. Each four-tuple of corners is ordered as follows: top-left, top-right, bottom-right, bottom-left. mTagIds and mTagCorners are indexed the same; that is, the corners in mTagCorners[0] represent the corners of the tag with ID mTagIds[0].
getClosenessMetricFromTagCorners()
Section titled “getClosenessMetricFromTagCorners()”It’s important to have some kind of closeness metric, since it identifies how far away a tag is (and if we’re moving, whether or not we’re getting closer to it). Again, there are a few different ways to implement this function, so we won’t tell you how to do it. Be creative!
For a closeness metric, you only need an approximation. It will be used to drive towards the tag and stop within a distance. Consider how you as a human would estimate how far something is from you. How would you approximate how far the vehicles in the image below are from you? How do you know they are different distances away? Be creative!
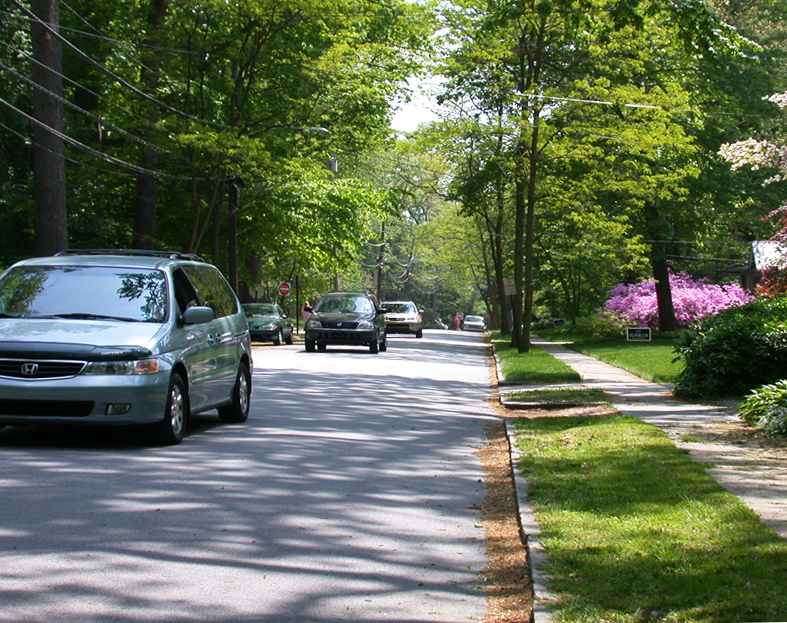
However you choose to implement the closeness metric, make sure to scale the number between 0 and 1 (where 0 is very close and 1 is far away), as the navigation starter project expects a range between these two numbers.
selectTag()
Section titled “selectTag()”We want to select the closest tag from the vector findTagsInImage() populates, since it makes sense to drive towards closer objects compared to farther ones. In other words, we want to pick the tag with the highest closeness metric.
If there are no valid ArUco tags in frame, you should publish a “dummy” tag with an ID of -1.
publishTag()
Section titled “publishTag()”Now that we have our desired tag, it is time to publish it to the proper topic. Implement Perception::publishTag. If you are unsure of the syntax, this example or a quick Google search will help you out.
Putting It All Together
Section titled “Putting It All Together”To test, run ros2 launch mrover_autonomy_starter starter_project.launch.py to open the simulator. In another terminal window, run ros2 topic echo /tag to monitor the output of perception. Don’t forget to auton_starter to set up each terminal window. Make sure your node (the code you wrote) is not crashing in the log output! ros2 topic echo /tag should at least be continuously publishing invalid tags with ID of -1.
You can drive the rover around by pressing p to enable physics, and then move with i,j,l, and ,. In the RViz window, press “Add” in the bottom left, then click the “by topic” tab, scrolling down and selecting the “/zed”, “/left”, “/image”, “Image” option, and click “OK”. This should open a small window in the bottom left displaying what the ZED camera sees inside the simulator. If you navigate the rover such that you can see the ArUco tag in the camera feed, but ros2 topic echo /tag isn’t publishing a valid (not -1) tag, you might have some errors in your code.
Otherwise, congratulations! You have successfully completed the perception starter project!
Debugging with VS Code
Section titled “Debugging with VS Code”As a disclaimer, it can be difficult to use a debugger with MRover software, and various tools like ros2 topic echo and print statements are usually more helpful. However, it is possible to use VS Code to debug the starter project. First, comment out perception_node from the starter_project.launch.py file. Now, when the starter project is launched, it won’t launch the perception node. You will instead be separately launching it from VS Code.
Now run ros2 launch mrover starter_project.launch.py in a terminal to launch the simulator and other two nodes.
In VS Code, hit Ctrl-Shift-P and run Cmake: Debug. Select “Unspecified” if it asks for a kit. Select the starter_perception target to run (these settings are also on the bottom bar).
Make sure to set breakpoints in the source code files! They can provide useful information that print statements can’t.
What is Camera Space?
Section titled “What is Camera Space?”
Consider the following image. Let’s say it is 400x400 pixels. We can define a coordinate system that starts at the top left corner, consider that (0,0) with positive values of x extending right and positive values of y extending downward. The center of the tag would be about (300,100) in this space. Here is a diagram to aid understanding:
